文件搜索感觉和Windows的Everything差不多,不过Alfred的WorkFlow感觉十分强大,但网上教程不多,这里记录下经验。
WorkFlow
官方文档
https://www.alfredapp.com/help/workflows/
https://www.alfredapp.com/help/workflows/inputs/script-filter/
定义
所有模块都是节点,输入 + 操作 + 输出
传递的参数有两种 {query} / {var: customer_key}
注意:每个节点不要做多个操作。如果是多步骤的,应该用多个流程节点拼接
概念
Filter
过滤结果,Alfred输入框下面的列表 ?
格式说明:https://www.alfredapp.com/help/workflows/inputs/script-filter/json/
Script
脚本,可以直接编写,或利用 bash 调用本地编写好的(如python)
常用流程节点
Script Filter
是 Input 的一种,可以关键字触发,然后唤起脚本
多节点可以连接,然后传递处理过的参数
输入:
显示在alfred输入框,且可以传递给脚本
python脚本
输入:
- {query} 使用 sys.argv[1] 获取
- {var: customer_key} 使用 os.environ[“key”] 获取
直接 print Filter 的结果即可显示在输入框下的列表
https://www.alfredapp.com/help/workflows/inputs/script-filter/json/
格式如下
1
2
3
4
5
6
7
8
9
10
11
12
13
14
{"items": [
    {
        "uid": "desktop",
        "type": "file",
        "title": "Desktop",
        "subtitle": "~/Desktop",
        "arg": "~/Desktop",
        "autocomplete": "Desktop",
        "icon": {
            "type": "fileicon",
            "path": "~/Desktop"
        }
    }
]}
点击列表项输出:
- {query} 使用 item { … “arg” : “xxx” } 传递
- {var: customer_key} 使用 item { “variables” : { “customer_key” : “xxx”} } 传递
也可以直接输出:
{query} 使用 sys.stdout.write(“xxx”) 传递
输出结果会继续向下个流程传递参数
还可以点击item调用其他系统默认action如打开浏览器等
实战
比如打包上传功能,可以不用 Jekins 然后用 Alfred 实现个自动打包上传的WorkFlow
Step1 触发

WorkFlow里新建一个Script Filter,然后用关键字进行触发脚本
Step2 环境选择
Step1触发的脚本如下,会显示两个环境供使用者选择
1
2
3
4
5
6
7
8
9
10
11
12
13
14
15
16
17
18
19
20
# coding:utf-8

import json
import sys

project_root_path = sys.argv[1]

items = {"items": [
    {"title": "环境:Debug", "valid": "true", "variables": {
        "env": "debug",
        "fir_url": "http://hey.scandown.com/xxxxdev",
        "project_root_path": project_root_path
    }},
    {"title": "环境:Release", "valid": "true", "variables": {
        "env": "release",
        "fir_url": "http://hey.scandown.com/xxxxpre",
        "project_root_path": project_root_path}
     },
]}
print(json.dumps(items))
Step3 确认环境
当用户选中环境回车后,会将variables里的参数继续向下个节点传递,继续触发python脚本
下个节点脚本接受属性后,会找到对应环境,先把项目里已有的打包文件显示出来,同时提供一个默认重新编译的选项。
1
2
3
4
5
6
7
8
9
10
11
12
13
14
15
16
17
18
19
20
21
22
23
24
25
26
27
28
29
30
# coding:utf-8

import json
import os

env = os.getenv('env')
project_root_path = os.getenv('project_root_path')
if not env:
    env = 'debug'
if not project_root_path:
    project_root_path = '/Users/xxxx project path'

items = {"items": [
    {"title": "重新编译并上传", "valid": "true"},
]}

app_name = 'XXX-DEBUG' if env == 'debug' else 'XXX'

# 获取目录下最新apk文件信息
apk_dir = project_root_path + 'app/build/outputs/apk/%s/' % env
if os.path.exists(apk_dir):
    files = os.listdir(apk_dir)
    files = sorted(files)
    # 倒序
    files.reverse()
    for file_name in files:
        if file_name.endswith('.apk'):
            items['items'].append({"title": file_name, "valid": "true", "variables": {"file_name": file_name}})

print(json.dumps(items))
Step4 确认打包
用户选择后继续最后一步
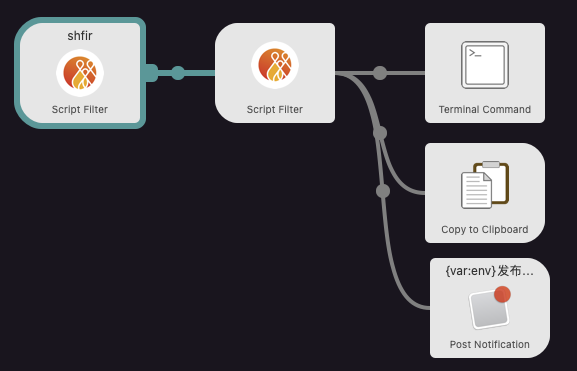
如果没选择apk,则先进行打包,之后再选择apk文件进行目标地址上传
同时你也可以给当前节点加上并行的WorkFlow Output节点,如通知提醒完成+自动复制下载地址到剪贴板
1
2
3
4
5
6
7
8
9
10
11
12
13
14
15
16
17
18
19
20
21
22
23
24
25
26
27
28
29
30
31
32
33
34
35
36
37
38
39
40
41
42
43
44
45
46
47
48
# coding:utf-8
import json
import os
import sys
import requests

# 打包
def build_apk(env, project_root_path):
    build_cmd = 'cd ' + project_root_path + ' && '
    build_cmd += ('./gradlew assemble' + ('Debug' if env == 'debug' else 'Release'))
    build_cmd += (' -D org.gradle.java.home=/Applications/Android\ Studio\ 2.app/Contents/jre/Contents/Home')
    os.system(build_cmd)

# 获取上传凭证里的二进制apk信息(略)
def get_api_token(env):

# 上传文件(略)
def upload_app_file(env, binary, project_root_path, file_name):

def main():
    # 为了方便查看进度,所以当前脚本直接用 Terminal Command 打开。但要注意 Terminal Command 只能接收 query 参数
    try:
        env = sys.argv[1]
        project_root_path = sys.argv[2]
    except IndexError:
        env = 'debug'
        project_root_path = '/Users/xxx project path'

    try:
        file_name = sys.argv[3]
    except IndexError:
        file_name = None

    if not file_name:
        print('build new apk %s' % env)
        build_apk(env, project_root_path)
        print('build done!')
        print('-------------------------')

    binary = get_api_token(env)
    print('get token done!')
    print('-------------------------')

    print('upload_app_file ...')
    upload_app_file(env, binary, project_root_path, file_name)
    print('all done!')

main()